Social distancing during the coronavirus outbreak may lead to many of us missing in-person contact with friends and family members. There is no disputing that the emotional impact of this can be incredibly difficult. But by making the most of modern technology, you can still keep your loved ones close (virtually of course) over the coming weeks.
Never has it been so easy to be miles apart from someone, but still be able to see and chat to them over a glass of wine or a cup of coffee. Some even go as far as to dine together, workout together, or watch the same TV shows at the same time – as they would if they were together in-person.
Whether you want to speak to the grandkids in Australia or have a Friday evening catch up with friends who across the country, video calling can help you do this from the comfort of your living room – without having any physical contact at all. We’ve been hearing wonderful stories about people connecting in ways they never have before. So even if you’ve never considered making a video call, now could be the perfect time to give it a go.
If you’re missing someone today and wondering how you might be able to connect with them over the next few weeks, then keep reading. In just a few short steps, they could be smiling in your front room with you!
How to video call from your smartphone
Android or iPhone: How to have a WhatsApp video call with up to four people

If you have an Android phone – which includes Samsung, Sony, LG, Huawei, OnePlus, Google and Honor (plus many more!) – then you won’t have the same Facetime feature as an iPhone, but will be able to make video calls by downloading a number of free apps. Some of the most popular ones include WhatsApp, Facebook Messenger and Houseparty. You’ll need to make sure that both yourself and the person that you want to call have the same video calling app installed.
Here, we will explain how to make a video call using WhatsApp, as it’s also a popular instant messaging app that many of your friends and/or family members may have already! You can also use this feature on an iPhone if you’d prefer to use something other than Facetime.
1. If you don’t already already have the WhatsApp app, then download it for free from the Google Play store (or the Apple Store if you’re using an iPhone). Once downloaded (this should only take a few minutes), open the app and confirm your phone number.
2. Once you’ve done this, you’ll be ready to start chatting! Before you go to make a video call, make sure that the person you want to call also has WhatsApp installed. You’ll know if they don’t because they won’t appear in your WhatsApp contact list.
3. When you’re ready to make a call, select the name of the person you want to call from your contact list. In this instance, we will pretend that we are calling ‘Mum.’ Once you’ve selected ‘Mum’ from your contact list, you will then go into a ‘chat’ screen where you will have the option to send her instant messages or start an audio or video call. To make a video call, select the video camera option (circled in green) in the top right-hand corner of the screen.


5. If you want to add other people to the video chat, then simply click the icon showing a person and a plus sign in the top right-hand corner of the screen. You can then select other contacts in your list to add to the call! You can video call up to four people at a time. When you’ve finished talking, simply press the red phone icon to hang up.
4. When the call starts to ring, the screen will automatically switch to ‘selfie-mode’ and your camera will start videoing you – so don’t be alarmed when you suddenly see your face on the screen! When ‘Mum’ answers, the video of you will shrink into the right-hand corner of the screen and the video of them will take the prime spot and you will now be free to start chatting!

How to video call your family using your laptop or desktop PC
The main advantage that you’ll have when video calling friends and family from a laptop or desktop PC is that the screen is larger than that on your phone. This can make the video calling experience feel closer to an actual in-person experience as though they are actually in the room with you. A larger screen also makes it easier to manage calls that have three or more people on them because you’ll have the option of using the ‘grid screen’ where you can see all their faces on the screen at the same time, without them all being too tiny (like they would on a smartphone). Finally, but no less important is that by using a laptop, you don’t have to hold your phone whilst you talk so you can free up your hands to grab a cup of coffee or a glass of wine!
There are plenty of different free video calling platforms that you can use on your laptop or desktop PC, with some popular ones being Zoom, Skype and Google Hangouts, all of which allow you to make video calls for free. With Zoom you can video chat with up to a 100 people at a time, Skype up to 50 and Google Hangouts up to 10 when using for personal rather than business calls.
For the purposes of this guide we are going to focus on showing you how to use Zoom, which can be used on both Windows and Mac computers. You can have a video call with up to 100 people on Zoom for free – but with a 40 minute time limit. But if you can stick to under 3 participants then you can chat for longer without having to pay for a premium account.
How to set up and make a video call on a desktop PC or laptop with Zoom
Before you can make a video call, you’ll need to have a working microphone and webcam. On laptops these are usually built in and on desktop computers they will often need to be bought separately.
When you set up Zoom on your laptop or desktop PC, you will be asked to practice the video calling process, by taking part in a test meeting. For this part, it would be helpful to have a friend on standby, so that they can join your meeting and help you practice the process. We will be using two willing participants – Herb, and Olivier, to demonstrate.

Herb

Olivier
To make a video call, you can then follow these steps:
1. Visit Zoom’s website and click the sign up button which you’ll find in the top right-hand corner. The first step of this is to enter your email address, which you will then be asked to verify. To do this, you’ll need to check your inbox for the verification email they will have sent you (check your junk if you can’t see it).
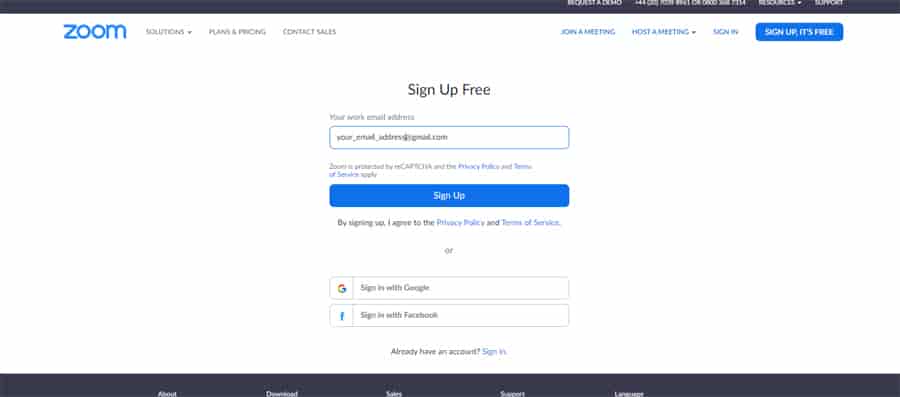
2. Click the verification button in the email and this will take you back to the Zoom website where you will see a welcome screen similar to the one below. Click ‘Next’ to continue with the sign up process.

3. Next you will be offered the option to invite your “colleagues” to also join Zoom. It’s important to note that these don’t have to be colleagues – they could be friends or family members instead. This step isn’t essential, as you can always skip it and do it later on in the process if you’d rather.
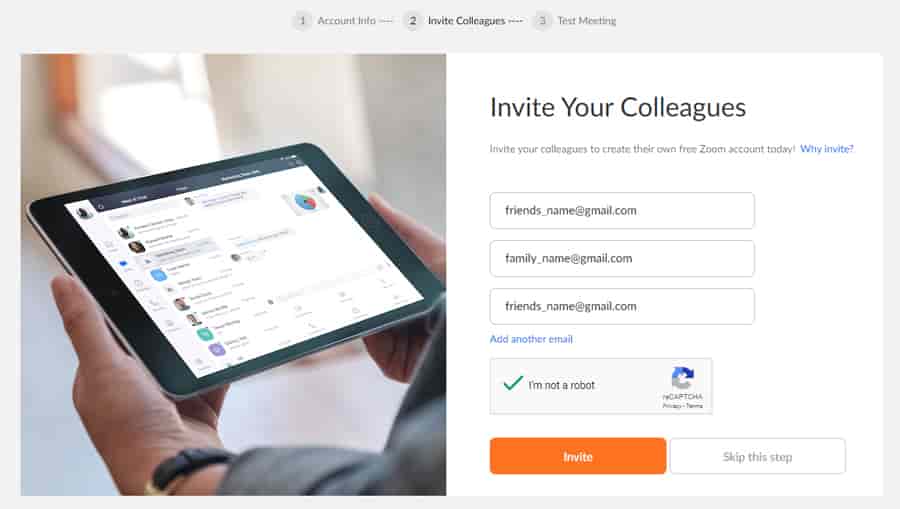
4. Once you’ve invited friends or family members, or skipped that step, you will be asked to create your Zoom account by entering your name and password. When you’ve done this, click ‘Continue.’

5. Next you should see a screen which will prompt you to start your test meeting. Once you do this, Zoom will begin installing itself on your PC. This process is quick and should only take a couple of minutes. You should see the following few screens during this time.


6. When you arrive at this screen, you will be asked to ensure that you are comfortable with the terms and conditions and privacy policy. If you are, then click ‘I agree.’

7. You will then be asked to join your test meeting using audio. We want to use audio and video, but we can add video later, so click the only option given for now which is to ‘Join with Computer Audio.’

8. Now that Olivier has joined his test “meeting” by audio, he will be entered into his own personal meeting room where he can invite others to join him. We can already see that his microphone is working because when he speaks, he can see that it says ‘Talking: Olivier Smith.’ at the top of the screen. To allow others to be able to see him via video, he will need to select the ‘Start Video’ option in the bottom left-hand corner of the screen.

9. Olivier can now see himself in the meeting room and is free to invite others. To invite others to your video meeting, you will need to click ‘Invite’ at the bottom centre of the screen. You will then be asked to choose which email platform you want to use to invite them to the meeting.

10. Olivier chose to send his invite via ‘Gmail’. Choose the email service that you would like to use to send your invite. Alternatively you can select the ‘Copy Invitation’ option in the bottom right of the pop-up box. This will give you the option to copy and paste the meeting invitation yourself and either save it somewhere or send it to a friend via an email or messaging option not mentioned in the options.
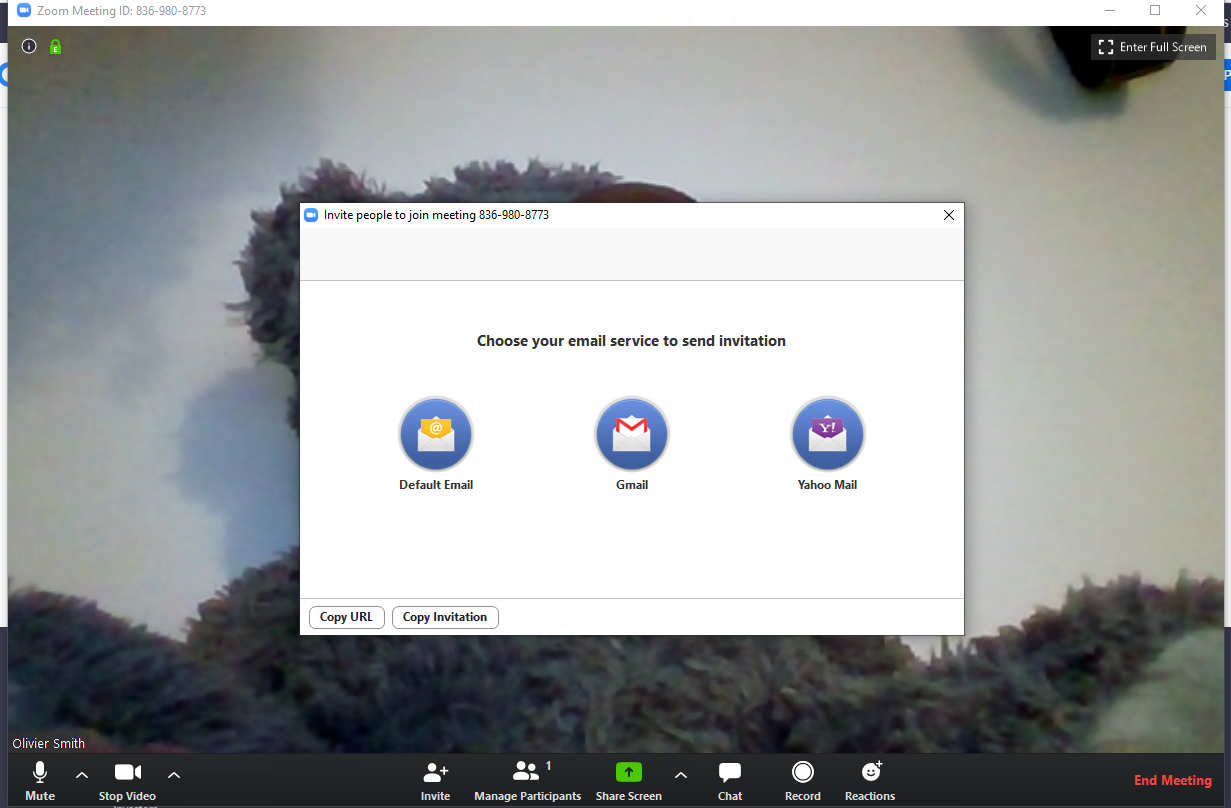
It’s up to you to choose how many people you choose to invite – but in this case Olivier only wanted to chat with one friend, so he entered his email address into the recipient box and clicked ‘Send.’ When his friend receives the invite, he will need to click the link and enter the meeting ID when asked.

11. A few moments later, Olivier’s friend Herb joined the meeting and they began video chatting. The video image of Herb came up very large on the screen and the video image of Olivier which was very large on the screen in the moment’s before he was called Herb, has now become more smaller, but can be seen in the top centre of the screen, just above Herb.
Olivier was confident that everything had been set up correctly because he and Herb were able to see and hear each other perfectly.

12. To end the video call, you’ll need to click ‘End meeting’ in the bottom right-hand corner of the screen.
Note: If you want to invite multiple friends and family members, then you would have sent them all a meeting invite by entering all of their email addresses. When chatting to multiple participants you can control how you see each other by selecting the arrow in between the ‘Share Screen’ and ‘Chat’ buttons in the bottom centre of the screen. Here you will be given the option to select either ‘One participant can share at a time’ – which means that every time a participant talks, they flash up on the screen so that everyone knows that they are talking and in the meantime everyone else will appear in smaller form at the top or bottom of the screen. Or, you can select the option ‘Multiple participants can share simultaneously’, which will allow you to see all participants at all times, whether they are talking or not. Your screen will be divided into an equal sized grid, with a family member or friend appearing in each rectangle/square – this can be a nice way of seeing everyone’s faces all at once.
How to join and schedule a Zoom meeting after the initial set-up process
After the initial setup process, whenever you want to make a video call, you will need to launch the Zoom application on your computer, which will now be present in your application menu (the location of this will differ depending on whether you have a Windows or Mac computer).
1. Once you’ve launched zoom, you will be met with the following screen.
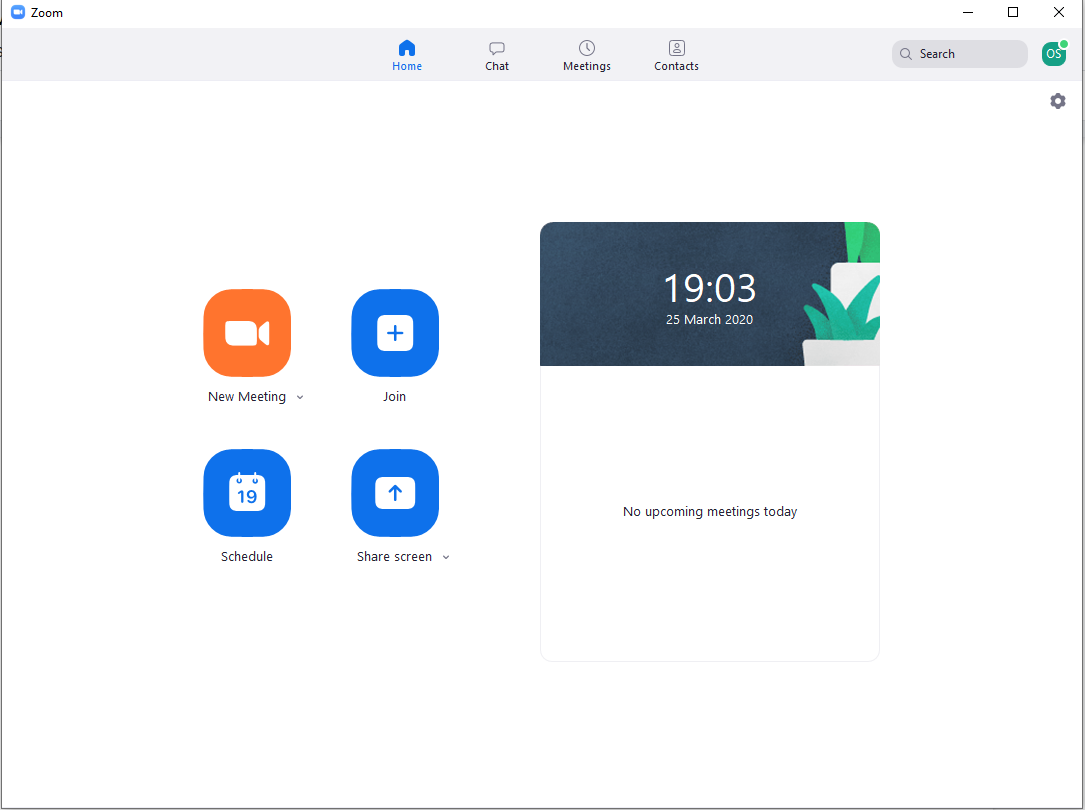
To start a new meeting, you can click the orange button and follow the same steps as you did during your test meeting to invite people to your meeting.
2. If you want to schedule a video call for a specific date and time, then click the ‘Schedule’ button. You will then be asked to plan your meeting. For this step, it’s worth referring to Zoom’s own guide on Scheduling a Meeting.
3. If a friend or family member has invited you to join a Zoom meeting, you can either join using the ‘Join Meeting’ button in the menu above, or via the URL link that the personal organising the meeting has provided you with. Zoom has created a full guide on how to join video meetings, which you can find here.
And finally...
We don’t want anyone to feel lonely or isolated during the coronavirus crisis, so we hope that this guide will help you to stay connected with others, whilst staying safe.
If you’ve never had a video call before, then it can be a bit strange at first, but it can also be a lot of fun. Try to view it as a chance to step outside of your comfort zone and learn something new, and don’t be afraid to have a laugh about it whilst you get to grips with it! You might also want to try experimenting with a few different video calling platforms to see which one works best for you.
Personally, I hadn’t done too much video calling or conferencing until recent weeks and although it was daunting at first, it has allowed me to feel much more connected to my friends, family and work colleagues. And I hope it does the same for you!